Name: Painting Flesh Tones with Artist
Oils
This Article was
written by Patrick Kirk
Step1
Step 2 and 3
Step 4
Step 5
This article is designed
to present a way for doing flesh tones for figures. It is in no way the
definitive manner, but a technique that has worked well for me, and has
given me solid consistent results, and wanted to share it with the figure
community. Its important to remember that with any new technique this will
take a few tries to get the results you want. I want you to focus on what
looks best to you; let that be the guide, and be the test you use to either
add a little more here or not.
Painting figures to me is a passion...you can watch as you paint him come
to life; watch as he begins to take on a personality that you as a painter
give to him...with that being said, you need to get a few supplies:
* Primer - this can be a white acrylic base or the figure primer
from Floquil. I use a simple white acrylic base from Grumbacher. A primer
is important, because it gives the paint something to bite on to and enriches
the colors.
* Artist oils, 1 tube of each (I recommend Winsor Newton since they
have in my opinion the richest colors and blend nicely):
- Burnt Sienna
- Cadmium Yellow Deep
- Cadmium Red Medium
- Yellow Ochre - Titanium White
- Burnt Umber
* Luiquidtex acrylic Israeli pink
* An old white cotton tee shirt
* Good red sable brushes 3 to 3/0 and a 00
* Thinner...I use Winsor Newton Sansodor (Low odour solvent) for oil colours.
* A crock pot...( I know, but trust me...we will use this to bake the paint
to flatten the paint dead flat)
* Wooden dowel about 3in
Once you have the supplies we can get started... I never paint the figure's
flesh tones while on the figure, if possible. If I can, I will detach all
the flesh parts, and put them on a wooden dowle, prime them, and then paint
them all in the same sitting to insure that the base, shadows and highlights
are the same. This way to, I can bake them all at the same time. A piece
of advice...I learned the hard way on this. Have a timer handy, one with
a bell, so that you don't forget that something is in the crock pot...
The crock pot is a great tool...whenever I use it, I set the temp to low
and only bake for no more than 15-20mins depending on the figure. I try
not to put the large scale DML or Tamiya plastic figures in for more than
15mins, but the hard resin and metal figures can take up to 20mins. When
you put the pieces in to bake them, have a way to prop them up inside the
pot; don't lay them down. I have a round base w/a hole cut in the middle
that I set the dowle in as it bakes...
Ok, on to the flesh tones. I use a mixture of burnt sienna (4 parts; a part
is a #3 brush about 1/2 covered w/ paint), cadmium yellow deep (2 parts),
cadmium red medium (2 parts) and a dab (tip of #3 brush) of yellow ochre.
This is the base color...mix this up on the pallet and get the colors blended
nicely. Then, with your tee shirt, wipe off the #3 brush you just used to
make sure none of the single colors on it (we will use this brush to lay
the paint on the figure).
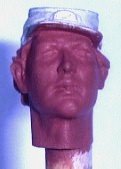
Take the figure's primed head and give it a nice even coat of the Luiquidtex
Israeli pink...letit dry for over night (See step 1 picture). The next sitting,
mix your base (see above) and with that same #3 brush we just cleaned with
the tee shirt, apply a nice light stain to the flesh areas. Don't worry
if you get some on the hair, we will paint over it.
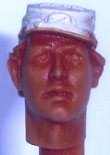
Once we have the stain on, take your white tee shirt and gently, very lightly
take it across the face. What will happen is that it will pull the paint
from the places where we put the highlights, leaving a very faint base stain
there, and deeper ones where we will put in the shadows. So what you should
have, is a face that is partially stained and looks kinda funky...but that
is good, cuz we know where to highlight without guessing (See step 2 and
3).
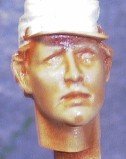
We want to lay in the highlights first since its easier to soften since
we already know where the highlights will go...(at least for me it is...you
might go the other way in time). Mix your highlight with titanium white
and cadmium yellow deep. Put a blob from the tube of each on your pallet,
and take your # 10/0 brush and grab two dabs (a brush tip full) of titanium
white and place it on the pallet. Then take a dab (a brush tip) of cadmium
yellow deep and simply tint the white slightly yellow...this becomes our
highlight.
Clean the brush off on the tee shirt and use it to softly apply to the areas
that have the light stain... pick a highlight, say the bridge of the nose,
and blend it in while the base coat is still wet...short brush strokes pulling
the paint off the brush and onto the highlights; then go back over the highlight
until its blended and you can't see the distinction between the base coat,
shadow area and the highlight. Once you have the highlights that you want
on the bridge, move to the nose flares, then to the cheeks, jaw line, and
forehead (See step 4).
It's important here not
to use a lot of the highlight (part of the reason for using the 10/0 brush,
too). Remember, with highlights we are using the tip of the brush (the sharp
edge) to apply the highlights.
Once I have the highlights on, I move to the eyeballs, and apply an acrylic
white to the eye socket. I go back to the highlight shade, and with the
00 brush, begin to highlight the skin around the eye socket. Once the eye
sockets are done, then I pick a color for the iris and apply it. As a general
rule, if you are painting the eyes straight forward, they should be centered
on the corner of the mouth...so if you draw an imaginary line from the corner
of the mouth straight up to the eyes, that is where the center of the eye
should be. Have a mirror handy so you can look at your eyes for reference
too.
Now take the figure's head with the
highlights laid in and put it in the crock pot...bake it between 15-20 mins
depending on the plastic. Pull it out and give it a quick look under a light
to make sure that you captured the highlights. Go back over the highlights
with just a very faint whiter shade of the highlight on those areas that
are typically more stark...like the nose flares, the chin, upper lip.
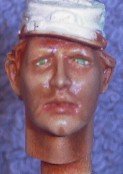
We are ready to lay in the shadows...Take the base color we mixed, and pull
a #3 brush full to another area on the pallet. Add a dab of burnt umber
to the mix to deepen the shade. Get your 10/0 and 00 brush ready, they will
do the shadow work for us. Take a good look at the face, and see where stronger
more contrasting shadows need to go and lay them in very softly using the
tip of the brush...10/0 works well along the sides of the nose, under the
chin and neck, while the 00 does well in the shadows in the forehead, eye
socket, cheek line and under the bottom lip.
We want to make glaze of this shadow base so a dab of thinner will get the
consistency we want. Once it is the consistency of milk, then begin to lay
the shadows in (See step 5).
When you are satisfied with the contrast between the highlights and the
shadows, its time to bake for the last time...when you take it out for the
last time, use a clean #10/0 brush to go back over the entire flesh area
and gently do a blending stroke...this will remove any separation lines
that might have been missed, and will give the flesh a blended look.
So there it is...remember this will take some time, don't get disappointed...try to work through it, and remember that oils are forgiving since they have a longer set up time than acrylics.
Good luck...